OpenWRT on Raspberry Pi 4
Posted on 2021-November-03 in networking

Gbit Routing
Driving a home Gbit Internet connection requires heavy hardware. Or maybe not?
Following recommendations on OpenWRT forums I tried it on a Raspberry Pi 4 with an additional USB3/Gbit adapter and the results are beyond anything I could have hoped for. This is not a cheap solution but it is probably the easiest to maintain and the most versatile I have found so far, with tons of potential for cool stuff.
In terms of performances I can reach a solid, reproductible 940Mbps on both interfaces when talking over a LAN one-way. I haven't tried full LAN/WAN simultaneous Gbit traffic but managed to max out my Internet connection with 1000 Mbps download and 500 Mbps upload simultaneously. I am not claiming those are accurate or rigourous measurements though. I am using iperf3 without any specific options to measure speed one-way:
On the server side:
iperf3 -s
On the client side:
iperf3 -i 1 -c SERVER_ADDRESS
Quick introduction to OpenWRT
OpenWRT is a Linux distro specialized for heavily-constrained routers. The minimum requirements are ridiculously small: eveything is optimized down in size to fit the smallest devices you can imagine. OpenWRT does an excellent job at replacing stock firmware on commercial routers from all vendors, often providing better performance and more features than the original firmware.
OpenWRT specializes in home routing: firewalling your home network from the Internet, adding Wi-Fi access points, connecting private networks, or driving VPN connections. I even used it to transform a connected hard drive into a Samba server. OpenWRT can be entirely configured through command-line and text config files in a familiar Linux environment. It also comes with a web-based GUI called Luci that is rather simple, user-friendly, and well-documented. What's not to love?
The most impressive thing about OpenWRT is the sheer number of supported devices from all architectures and sizes, and the fact that they keep supporting hardware for such a long time after those products have been end-of-lifed by their vendors. I cannot thank the team enough for all their dedication and hard work. Wonderful job, guys!
Shopping List
To transform an RPi4 into a Gbit router you will need:
| Part | Price |
|---|---|
| RPi4 | 50-100€ |
| Power Supply | 10€ |
| Case + Fan | 10-20€ |
| USB3/Gbit adapter | 10€ |
| USB3 Thumb drive or SD card | 5-10€ |
| Total | 85-150€ |
Prices will vary a lot depending on what/when/where you buy. You should try to find the smallest possible RPi4, a 1GB RAM model will work perfectly fine if you can still find one (on eBay?). Having 2 or 4GB is perfectly overkill. In my case I just used a 4GB model that was gathering dust in a drawer, so I'm wasting about 4GB of RAM.
Power supply: the official one is graded for 3 Amperes. This is what I am using. More is better, less than that will probably not be sufficient to power the Pi.
Case: you don't want to leave your RPi4 without protection and you do want to cool it down. Get a case with a silent fan or one that is passively cooled with a large metal heatsink. I picked a really cool and very blue one from Geeekpi with a completely silent fan. Neat!
USB3/Gbit adapters are not all equivalent, there are good ones and really bad ones. I had excellent results with a TP-Link UE300 (11€ on Amazon in Oct 2021), where some other adapters I have never managed to get past 500Mbps. I picked the UE300 following a large number of recommendations on the OpenWRT forums. There were lots of doubts about the reliability of USB-based network adapters but so far I haven't had any trouble, the thing is remarkably stable.
Here are stats obtained after a couple of days of uptime:
eth1    Link encap:Ethernet  HWaddr xx:xx:xx:xx:xx:xx
        inet addr:192.168.x.x  Bcast:192.168.x.x  Mask:255.255.255.0
        inet6 addr: fe80::xxxx:xxxx:xxxx:xxxx/64 Scope:Link
        UP BROADCAST RUNNING MULTICAST  MTU:1500  Metric:1
        RX packets:124584287 errors:0 dropped:125585 overruns:0 frame:0
        TX packets:92614690 errors:0 dropped:0 overruns:0 carrier:0
        collisions:0 txqueuelen:1000
        RX bytes:148704416920 (138.4 GiB)  TX bytes:92963352990 (86.5 GiB)
This is the USB/Gbit NIC: no RX/TX errors. The dropped packets are due to the firewall doing its job.
Optionally: you may want to keep a USB keyboard and a screen with micro-HDMI plug handy. One of the advantages of using a Pi instead of a dedicated router is that it is meant to be a desktop, with two HDMI and additional USB ports. Compared to debugging a box with a JTAG link this is luxurious.
You probably want to keep a laptop or computer nearby with Ethernet cable to connect to the Pi when it is network-ready, though you could theoretically do everything from the command line on the Pi console.
Preparing the Pi
Optional: use a USB thumb drive to boot the Pi. You can of course use an SD card, but USB thumb drives seem a bit more reliable. The minimal size you want should be 1GB. To update the Pi's bootloader and EEPROM, follow the instructions from the raspberrypi.org web site
You will need to flash a recent version of Raspberry OS on an SD card, boot from that, then call the raspi-config utility and make sure the EEPROM and bootloader are up-to-date, then switch the boot order to get a chance to boot from USB.
Next: you need the latest OpenWRT image for Raspberry Pi 4. Right now (Oct 2021) this is at:
You want rpi-ext4-factory-img.gz
Alternatively: use OpenWRT image builder.
The next operations can be performed directly from your RPi4 as booted into Raspberry OS, but if you have a Linux machine handy it is probably best to use it.
Download the image, gunzip it, flash it to your USB thumb drive. You now have two partitions on your target USB thumb drive: first one is the DOS partition used for booting, the second one is an ext4 containing the whole OpenWRT system.
You want to resize the partitions as OpenWRT won't do that by itself. Use parted or equivalent to:
- Resize the second partition to 1GB
- Add a third partition to cover the rest of your USB drive
- Resize the ext4 filesystem on the second partition with resize2fs
- Create an ext4 filesystem on the third partition with mkfs.ext4
First Boot
Your USB drive is now ready to boot! Plug it into the RPi4, remove the SD card, connect the screen and keyboard. Don't connect the USB/Gbit adapter yet, connect the Pi's native Ethernet to something that gives it Internet access as it will be needed to download the USB/Gbit driver. Power on the Pi. Your first login doesn't require a password and you are root.
Check you have Internet connectivity. If you don't it probably means the Pi's native Ethernet is registered for LAN usage. You can edit /etc/config/network to temporarily switch it to DHCP like this:
config interface 'lan'
    option device 'eth0'
    option proto 'dhcp'
Restart the network with /etc/init.d/network restart and shut down the firewall with /etc/init.d/firewall stop.
Once online, update the list of packages:
opkg update
Download the driver for your USB/Gbit adapter. For UE300 this is kmod-usb-net-rtl8152:
opkg install kmod-usb-net-rtl8152
Installing the driver won't show you an additional Ethernet device yet. You need to edit /etc/config/network once more to assign your NICs. I chose to keep eth0 (the native Ethernet) for LAN and use eth1 (the USB dongle) for WAN. Pick a static address for your router: in the following example I chose 192.168.44.1:
config interface 'loopback'
    option device 'lo'
    option proto 'static'
    option ipaddr '127.0.0.1'
    option netmask '255.0.0.0'

config interface 'lan'
    option device 'eth0'
    option proto 'static'
    option ipaddr '192.168.44.1'
    option netmask '255.255.255.0'

config interface 'wan'
    option device 'eth1'
    option proto 'dhcp'
Restart the network and you should be able to see all interfaces with iconfig.
Configure OpenWRT
You now have a working RPi4 router but can't do much with it yet. Use an Ethernet cable to connect a laptop/desktop to the Pi's LAN, in my case this is eth0, the Pi's native Ethernet. Manually assign an IP on that link to be part of the same subnet, e.g. 192.168.44.100, make sure your link is up, open a browser, browse to URL http://192.168.44.1/
You should get the LuCi interface for OpenWRT. Log in as root (no password) and from there on you are in OpenWRT territory. Time to read the docs, understand it a bit better, and configure it to suit your needs.
Next steps:
Mount your third partition
You prepared a third partition on the USB thumb drive, you can mount it for additional storage space e.g. on /data:
opkg install block-mount
block detect > /etc/config/fstab
Edit /etc/config/fstab and keep only the last entry, the one for your third partition. The result should look like:
config mount
    option target '/data'
    option uuid 'xxxxxxxx-xxxx-xxxx-xxxx-xxxxxxxxxxxx'
    option options 'noatime'
    option enabled '1'
where the uuid corresponds to your third partition, as detected by block detect.
Make it more Unix-like
Remember to run opkg update before you start installing stuff. You probably want to add a non-root user and some default Unix utilities like bash, vim, tmux, and diff:
opkg update
opkg install bash vim tmux diffutils
opkg install shadow-useradd shadow-groupadd
Do not install shadow-passwd as it will completely mess up your password file.
Use useradd and groupadd to add a non-root user with bash shell and home in /home. Give it a password with passwd USERNAME.
Try login in as that user now and make sure you can su to root. You can also change root's default shell by editing /etc/passwd. You can also add sudo, don't forget to add your non-root users to the list of sudoers.
Add networking tools
Add some utilities:
opkg install iperf3 tcpdump netcat nmap ethtool
iperf3 is always useful for benchmarking from the router itself. tcpdump, netcat, nmap, and ethtool are convenient tools to have handy on a router.
Add Statistics
Additional services and their interfaces:
- nlbwmon, luci-app-nlbwmon: bandwidth monitoring tools with details per device
- vnstat, luci-app-vnstat: bandwidth daily, weekly, monthly usage with graphs
- luci-app-statistics for more general statistics about your router
- luci-app-wol for wake-on-lan support on the web interface
Replace dropbear with openssh
The default ssh server on OpenWRT is dropbear. You can replace it with openssh to make things a bit more familiar. Dropbear does not support as many ssh key types (e.g. ed25519) and centralizes all trusted keys inside /etc/dropbear. Since you have a non-root user you probably want to manage its keys in ~/.ssh instead.
Open a first ssh connection to your device and leave it open. Open a second one and move dropbear to listen to another port instead, like 2222. Edit /etc/config/dropbear:
config dropbear
    option PasswordAuth 'on'
    option RootPasswordAuth 'on'
    option Port '2222'
Restart it with /etc/init.d/dropbear restart and make sure you can still connect to your router:
ssh -p 2222 root@192.168.44.1
Now install openssh and related packages and start it up:
opkg install openssh-server openssh-sftp-server
opkg install openssh-client openssh-keygen
/etc/init.d/sshd start
Backing up vnstat
vnstat forgets everything on each boot. You probably want to persist those stats as they may be useful to monitor the long-term health of your router. You can find a nice description of how to achieve that here:
Monitoring Temperatures
OpenWRT is a Linux distribution so you get some perks too: the CPU temperature can be read from the pseudo-file /sys/class/thermal/thermal_zone0/temp which gives you a temperature in milliCelsius. To get those readings into reported statistics I had to mess up with /etc/config/collectd and add that section:
config plugin 'thermal'
    option enable '0'
    option IgnoreSelected '0'
    option ForceUseProcfs 'false'
Adding static DHCP leases
For all machines on my home network I like to assign static IP addresses. Two ways to achieve that:
Edit /etc/config/dhcp and add one section per machine, like:
config host
    option name 'myprinter'
    option mac '00:00:00:f4:29:ad'
    option ip '192.168.44.20'
Or use a script to generate two files: /etc/hosts and /etc/ethers, containing respectively:
The list of IP/name pairs:
# Hosts
192.168.44.1        router
192.168.44.2        wifi
# etc.
and the list of MAC/name pairs:
00:00:00:00:20:e2 router
00:00:00:aa:20:5e wifi
dnsmasq will honour the presence of those two files if you select the right options in Services/DHCP.
Adding an Ad Blocker
Adding a DNS-based ad blocker is probably a good idea. Check out this write-up for a good description of how to install AdGuardHome on a RPi4/OpenWRT box:
The latest version I installed with opkg (opkg install adguardhome) comes with an incompatible binary. Just download the arm64 version from the AdGuardHome github, replace it in /usr/bin and you should be all set.
Gallery
Now for some screenshots just to spice up that post.
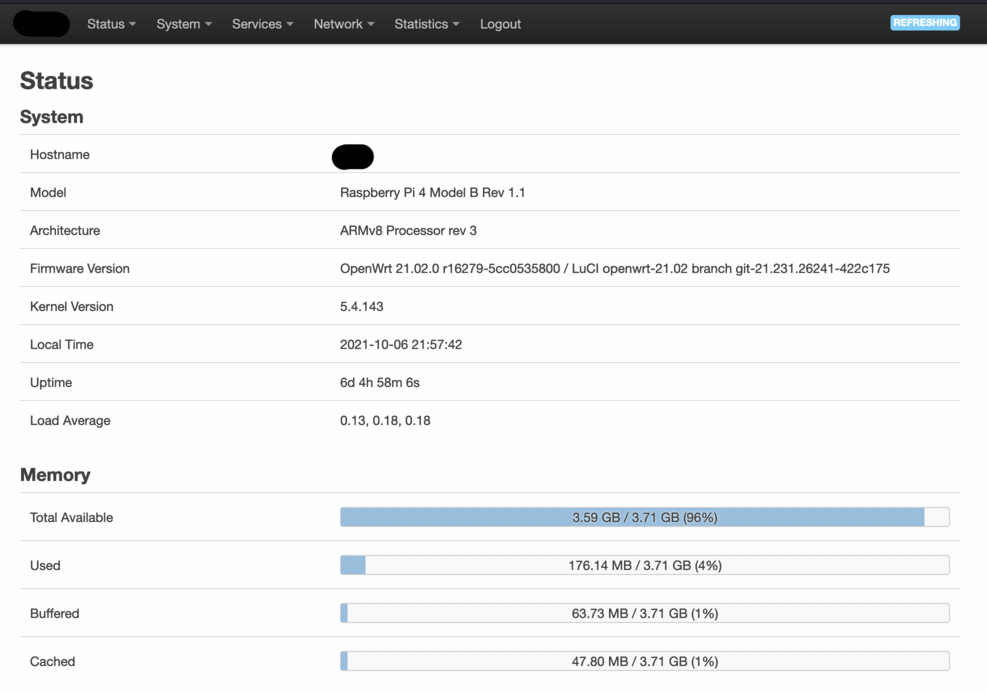
The main status page:
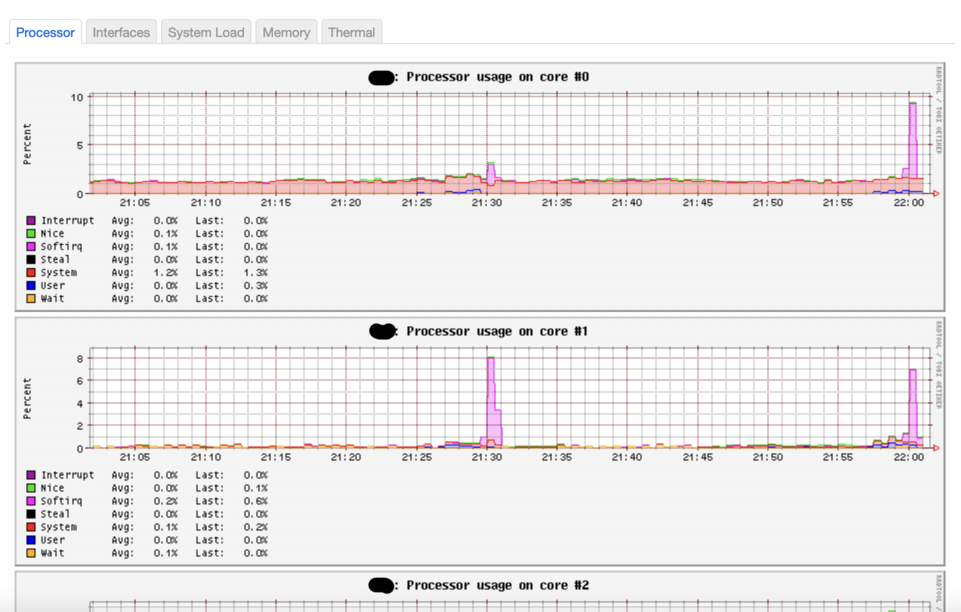
CPU usage for the first two cores is fairly limited. The last two cores are mostly unused.
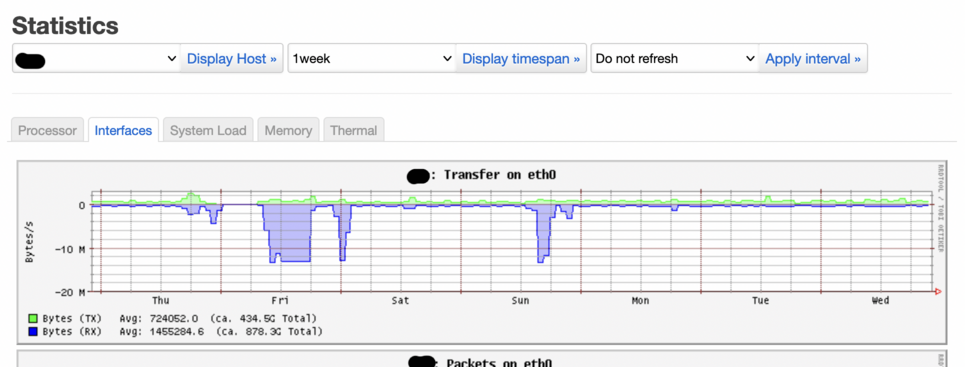
Network usage on the internal NIC:
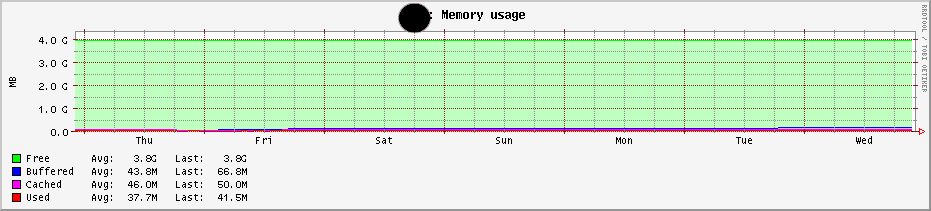
Temperature monitoring:

Memory usage is just ridiculous. About 4 gigs free out of 4 gigs. Try finding the smallest RPi4 you can lay your hands on.
Conclusion
Give it a try! Worst that could happen: your RPi4 goes back to gathering dust on a shelf with the other Pis.